Working with Huawei AR Engine
Huawei AR Engine SDK Versions Supported by EasyAR
EasyAR Sense Unity Plugin support the official Huawei AR Engine Unity SDK 2.11.0, released as arenginesdk-tool-2.11.0.2.zip file.
Unity SDK of AR Engine is not maintained officially by Huawei right now, so we are not sure if a later version of AR Engine could be used. Also, because Huawei AR Engine Unity SDK uses some deprecated Unity API, it is not usable in Unity 2020.1 or later.
EasyAR Sense Unity Plugin does not support Huawei AR Engine without its official Unity SDK at present.
Import Huawei AR Engine Unity Asset Package
Skip this step if you already have a usable Huawei AR Engine Unity SDK project.
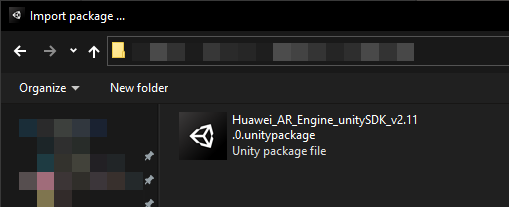
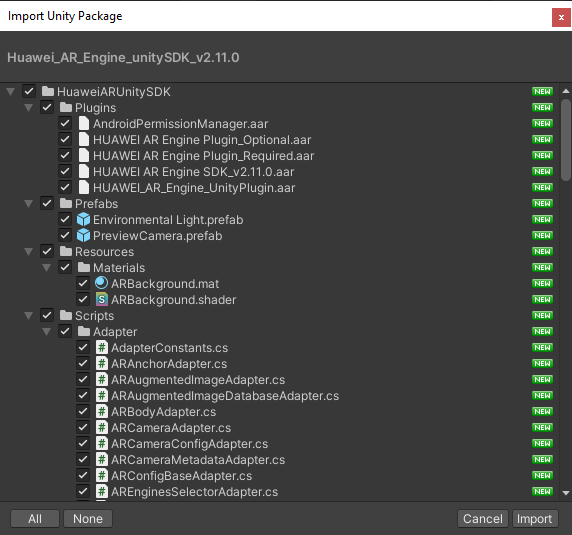
Get Huawei AR Engine Unity SDK first, and use Unity > Assets > Import Package to import its unitypackage.
Create Huawei AR Engine Unity Package (Virtual)
Huawei AR Engine Unity SDK is not published as a Unity Package at the time of this version release. But EasyAR will use Unity Package to check and use dependencies.
Create com.huawei.arengine folder inside Packages folder of Unity project, and create package.json inside com.huawei.arengine with following contents. Please notice that the value of version should be same with Huawei AR Engine Unity SDK distribution you get.
{
    "name": "com.huawei.arengine",
    "displayName": "HUAWEI AR Engine",
    "version": "2.11.0",
    "unity": "2017.4",
    "description": "",
    "keywords": [],
    "dependencies": {}
}
Create Huawei.AREngine.asmdef file inside Assets/HuaweiARUnitySDK/Scripts folder of Unity project with following contents.
{
    "name": "Huawei.AREngine",
    "references": [],
    "includePlatforms": [
        "Android",
        "Editor"
    ],
    "excludePlatforms": [],
    "allowUnsafeCode": false,
    "overrideReferences": false,
    "precompiledReferences": [],
    "autoReferenced": true,
    "defineConstraints": [],
    "versionDefines": [],
    "noEngineReferences": false
}
Create Huawei.AREngine.Editor.asmdef file inside Assets/HuaweiARUnitySDK/Scripts/Editor folder of Unity project with following contents.
{
    "name": "Huawei.AREngine.Editor",
    "references": [
        "Huawei.AREngine"
    ],
    "includePlatforms": [
        "Editor"
    ],
    "excludePlatforms": [],
    "allowUnsafeCode": false,
    "overrideReferences": false,
    "precompiledReferences": [],
    "autoReferenced": true,
    "defineConstraints": [],
    "versionDefines": [],
    "noEngineReferences": false
}
Then file structure inside Unity project will be like this,
.
├── Assets
│   └── HuaweiARUnitySDK
│       ├── Plugins
│       ├── Prefabs
│       ├── Resources
│       └── Scripts
│           ├── Editor
│           │   └── Huawei.AREngine.Editor.asmdef
│           └── Huawei.AREngine.asmdef
└── Packages
   └── com.huawei.arengine
       └── package.json
This virtual package is not needed if Huawei publish its SDK using Unity Package in future. If the package name is not equal to the value above at that time, all com.huawei.arengine strings from .asmdef files inside EasyAR package should be replaced with the official name.
Create a Scene Usable that can run Huawei AR Engine
Skip this step if you already have a usable Huawei AR Engine Unity SDK project.
Create a usable scene that can run Huawei AR Engine. You can use Huawei AR Engine Unity SDK samples as a start if you can find them.
Or you can create a scene from scratch. It is very simple.
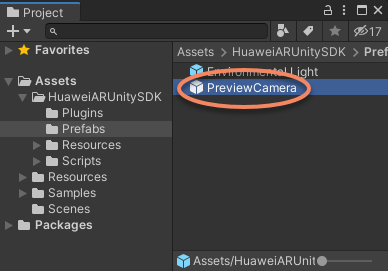
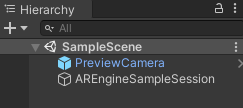
First, you need to add PreviewCamera into the scene, it can be found as a prefab in Assets/HuaweiARUnitySDK/Prefabs/PreviewCamera.prefab.
Then create an empty node and name it to AREngineSampleSession, add a new component to it to handle AR Session of Huawei AR Engine. A very simple example of a reusable session could be like this,
using UnityEngine;
using easyar;
using HuaweiARUnitySDK;
using System;
using System.Collections;
using HW = HuaweiARUnitySDK;

namespace Sample
{
    // NOTE: AR Engine do not handle update order, but everything should go after ARSession.Update.
    //       Use the undocumented DefaultExecutionOrder is a simple solution for package distribution, you can use your own way.
    [DefaultExecutionOrder(int.MinValue)]
    public class AREngineSampleSession : MonoBehaviour
    {
        public ARConfigBase Config;

        private bool isSessionCreated;
        private bool? installed;
        private Vector2Int resolution;
        private ScreenOrientation orientation;

        private void Start()
        {
            if (Application.platform != RuntimePlatform.Android) { return; }
            StartCoroutine(CreateSession());
        }

        public void Update()
        {
            if (!isSessionCreated) { return; }
            SetDisplayGeometry();

            AsyncTask.Update();
            HW.ARSession.Update();
        }

        public void OnDestroy()
        {
            if (!isSessionCreated) { return; }
            HW.ARSession.Stop();
        }

        public void OnApplicationPause(bool isPaused)
        {
            if (!installed.HasValue && !isPaused)
            {
                CheckService();
            }
            if (!isSessionCreated) { return; }

            if (isPaused)
            {
                HW.ARSession.Pause();
            }
            else
            {
                HW.ARSession.Resume();
            }
        }

        private IEnumerator InstallRequired()
        {
            CheckService();
            while (!installed.HasValue)
            {
                yield return null;
            }
        }

        private IEnumerator CreateSession()
        {
            yield return InstallRequired();
            if (CheckService())
            {
                CameraDevice.requestPermissions(EasyARController.Scheduler, (Action<PermissionStatus, string>)((status, msg) =>
                {
                    if (status != PermissionStatus.Granted)
                    {
                        throw new UIPopupException("Camera permission not granted");
                    }

                    try
                    {
                        HW.ARSession.CreateSession();
                        HW.ARSession.Config(Config);
                        HW.ARSession.Resume();
                        HW.ARSession.SetCameraTextureNameAuto();
                        SetDisplayGeometry();
                        isSessionCreated = true;
                    }
#if false // you can turn on this code path if you change the class to public
                    catch (ARCameraPermissionDeniedException)
                    {
                        throw new UIPopupException("Camera permission not granted");
                    }
                    catch (ARUnavailableServiceApkTooOldException)
                    {
                        throw new UIPopupException("This AR Engine is too old, please update");
                    }
                    catch (ARUnSupportedConfigurationException)
                    {
                        throw new UIPopupException("This config is not supported on this device");
                    }
#endif
                    catch (ARUnavailableDeviceNotCompatibleException)
                    {
                        throw new UIPopupException("This device does not support AR Engine");
                    }
                    catch (ARUnavailableServiceNotInstalledException)
                    {
                        throw new UIPopupException("This app depend on AREngine.apk, please install it");
                    }
                    catch (SystemException e)
                    {
                        throw new UIPopupException($"{e.Message} Please restart the app");
                    }
                    catch (ApplicationException e)
                    {
                        throw new UIPopupException(e.ToString());
                    }
                }));
            }
        }

        private bool CheckService()
        {
            if (installed.HasValue) { return installed.Value; }
            if (Application.platform != RuntimePlatform.Android)
            {
                installed = false;
                return false;
            }

            installed = AREnginesApk.Instance.IsAREngineApkReady();
            return installed.Value;
        }

        private void SetDisplayGeometry()
        {
            if (resolution.x != Screen.width || resolution.y != Screen.height)
            {
                resolution = new Vector2Int(Screen.width, Screen.height);
                HW.ARSession.SetDisplayGeometry(resolution.x, resolution.y);
            }
            if (orientation != Screen.orientation)
            {
                orientation = Screen.orientation;
                HW.ARSession.SetDisplayGeometry(resolution.x, resolution.y);
            }
        }
    }
}
Right click in Project window and create a Huawei AR Config, for example by Create > HuaweiARUnitySDK > WorldTrackingConfig,

And set it to AREngineSampleSession Config,

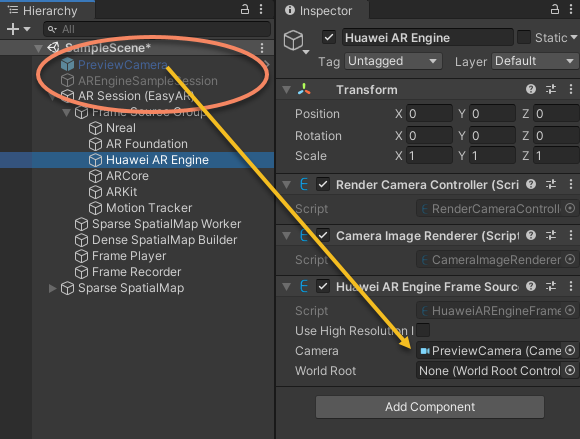
Then the scene will be look like this and it is ready to run,
You can also add Environmental Light or plane detection using prefabs and scripts. The sample HuaweiAREngine enables both Huawei AR Engine plane detection and AR anchor usages and EasyAR sparse and dense spatial map building, you can reference that sample for more details.
Add EasyAR Components in the Scene
Add EasyAR AR Session and other necessary nodes in the scene. You can reference Start from Zero for startups. AR Session can be created from some AR Session presets or constructed from standalone feature nodes using EasyAR Sense > GameObject menu. You need to make sure there is a HuaweiAREngineFrameSource in the session.
AR Session presets from SpatialMap, Cloud SpatialMap, Motion Tracking contain HuaweiAREngineFrameSource

AR Session presets with the name Motion Fusion from Image Tracking and Object Tracking also contain HuaweiAREngineFrameSource
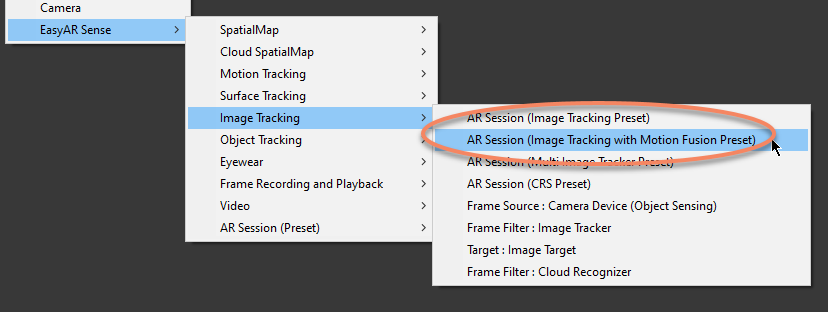
To use EasyAR with Huawei AR Engine, HuaweiAREngineFrameSource must be selected as frame source in the AR Session after Session start.
This could usually be done by set ARComponentPicker.FrameSource to FirstAvailableActiveChild and make sure HuaweiAREngineFrameSource is the first frame source that can be used in transform order,
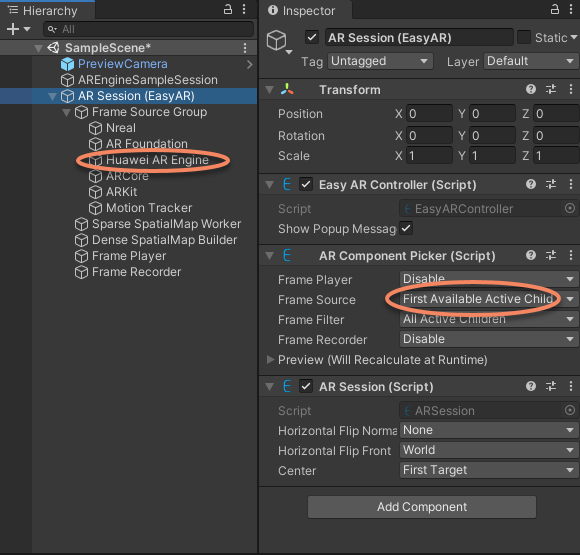
The NrealFrameSource and ARFoundationFrameSource in above image will not be chosen if Nreal SDK and AR Foundation is not imported and added into the scene, so it is safe in this kind of usage.
Or set ARComponentPicker.FrameSource to Specify and specify the frame source to HuaweiAREngineFrameSource .
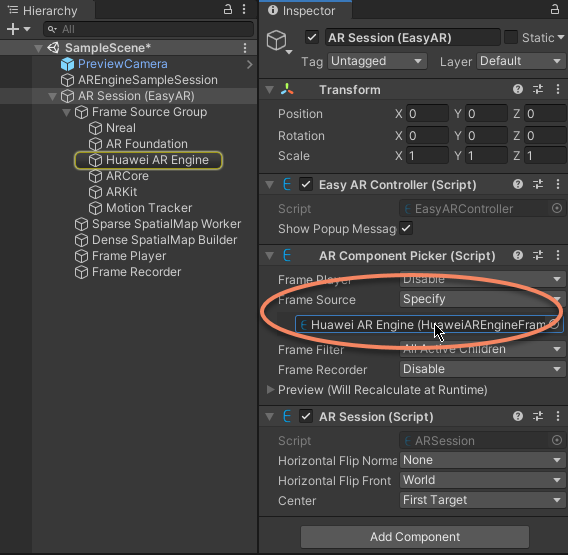
HuaweiAREngineFrameSource can be added to AR Session from menu EasyAR Sense > Motion Tracking > Frame Source : Huawei AR Engine if it does not exist in the session.
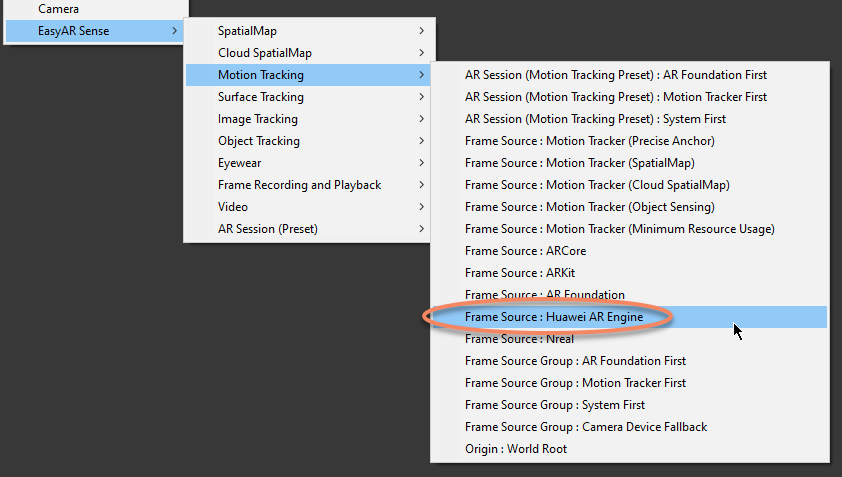
Then add targets or maps in the scene, for example, if you want to build Sparse SpatialMap, you need to create SparseSpatialMapController by EasyAR Sense > SpatialMap > Map : Sparse SpatialMap

Finally, a simple scene for sparse and dense spatial map building with Huawei AR Engine could look like this,
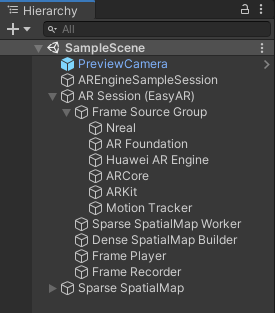
Scenes can be different according to features in use from both Huawei AR Engine and EasyAR Sense Unity Plugin.
Choose Huawei AR Engine in Runtime
MotionTracking_Fusion sample shows an advanced usage, to choose frame source at app start up according to device capability and enables runtime switch of available frame sources. To achieve this kind of usage, you need to deactive Huawei AR Engine GameObjects and set all required values of all frame sources for availability check, and active Huawei AR Engine GameObjects when this frame source is chosen.
